
My daughter loves to draw and craft and also loves Harry Potter. For her birthday, I wanted to make her a storage case to hold all of her art supplies. However, I didn't want to just buy one or make some simple boring design. Then the idea came to me to create a Harry Potter inspired design. Having just re-watched Fantastic Beasts and Where to Find Them, I immediately knew what I wanted to do.
I decided to base the design off of Newt Scamander's suitcase and to add some extra details from the Harry Potter series. This project took about a month to design and then another 2-3 weeks to make, troubleshoot, and perfect.
If you'd like to create your own Newt Scamander art case, please consider supporting my channel:
PLANS AND CUT FILES
READY TO ASSEMBLE KITS
Special thanks to Epilog Laser for sponsoring this project! To find out more about Epilog and their machines, CLICK HERE
MATERIALS USED
- 1/4" MDF
- STARBOND CA GLUE (USE CODE: MAKER10 to save 10%)
- Sander
- Wood Glue
- Glue Mat
- Silicone Glue Brush
- Clamps
- Shop Towels
TOOLS USED
For this project, I used my laser machine.
- Laser specs: 60 watt Epilog Fusion M2 40
- Vector Cutting: 5% speed, 100% power, 625 frequency (25%)
- Cutting time: 1 hour for all pieces
STEP 1: Designing the Art Case
I used Fusion 360 to create a 3D model of the art case design. I started by planning out the overall dimensions of the box based on what I wanted to store in it, such as sketch books, pencils, markers, etc. Once I had the rough dimensions, I started modeling each of the sections one by one until I had the completed framework.
After a couple of weeks of design, I came up with an idea for the locking mechanism that would keep the lid closed as well as the drawer locked shut. This process took a few iterations of design to get right, but it works out great. The most important part of this project is that I wanted it to be made with only a laser. This meant that all hinges, handles, locking mechanisms, etc. must be made from laser cut pieces. This was the challenge that I set for myself.
This challenge pushed me to design with a constraint and forced me to develop different methods to achieve what I wanted. Although it was frustrating at times, it was well worth the frustration when I saw the end results.


STEP 2: Prep the Design for Laser Machining
There are probably multiple ways to translate the design into a file that can be cut. For me, the easiest way to do this is to create a drawing of each of the components and lay them out onto a drawing sheet. This gives me a 2D profile of each part that can be read by the laser. Keep in mind, this may be time consuming, but I rarely have issues with this method.

In addition to creating 2D profiles of each part, I also decided to create assembly instructions. I do this to help me when it comes to making the final project as well as to make it available to others. I create these by using the Animation workbench in Fusion. I create a new animation for each sub-assembly and then import those animation views into drawing views where I create the final drawings.

STEP 3: Laser Cut the Parts
To cut my design, I used my Epilog Fusion M2 40, 60 watt laser. Although my laser is capable of machining 28" x 40" sheets, I designed the file for 12" x 24" to be more accessible for other users. This meant that I had to use five sheets of 12" x 24" MDF to create my parts. Keep in mind that not every sheet was full due to the size of some of the parts. The cutting process took about one hour to complete at 100% power, 5% speed.


STEP 4: Prep the Parts for Assembly
Normally when I create laser cut projects, I take them directly from the laser and prime them for painting. On this project, I decided that I wanted to assemble everything before painting to make sure that everything fit together. The tolerances on this project are so tight that any thickness variation due to paint would cause issues. With that in mind, I still wanted the pieces to have a clean look once they were assembled. To do this, I sanded every part using 220 grit sand paper on my orbital sander. This was enough to get rid of the laser marks on the surface without taking off so much material that there were issues with assembly. Make sure you sand lightly as to not remove too much material.


STEP 5: Assemble the Box
The assembly of this design is straightforward for most of the sections such as the base, the lid, and the body of the drawer. The parts of this that are going to be tricky are the hinges, and the locking mechanisms that are part of the drawer. If you are unsure of any of the steps in the assembly drawing, please read this guide completely and if you are still having trouble, please contact me.
When assembling the box, I used both wood glue and CA glue. The wood glue creates a more permanent long lasting bond and the CA glue helps hold the parts in place while the wood glue cures. Using both reduces the need for clamps during assembly and is necessary in areas where clamps won't work.
I suggest that you do a dry fit of each assembly to make sure that all of the parts go together and that you understand how it will be assembled. This will help reduce confusion and issues during the glue up process.

Base Assembly
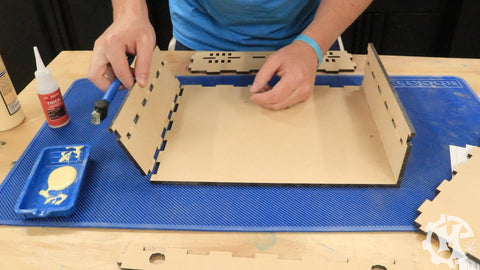
The best place to start is with the base of the box. Make sure you have all of the pieces pertaining to the base section as seen in the image below.

I started the base by attaching each of the side pieces with wood glue. When doing this, just have them in the correct position but not dry in place because we will insert the middle shelf next.
Once the sides are on, attach the middle shelf to the side panels with wood glue applied to mating surfaces. When assembling this shelf, you will have to move the side panels outward to fit the middle shelf in and then press them all together once it is in place.

Attach the back panel of the base. This will give the box more stability and start holding it all together.

The last part of the base section is to attach the small front panel that goes on the top half. After this is attached, I put a few E-Z hold clamps on the box to help hold it together while it dried. This probably wasn't necessary, but it doesn't hurt. Once it is assembled, set it to the side and let it sit for at least 30 minutes so that glue can begin to set.


Lid Assembly
Now that the base is assembled, it's time to assemble the lid. The lid is pretty straight forward. The main challenge on this part is making sure that the face plate and name plate are aligned properly. Make sure that you have all of the pieces necessary from the image below.

For the structure of the lid, the order of assembly on the panels isn't critical. I started with the back panel and worked my way around in a clockwise pattern until the four walls were attached to the lid panel. Laying the panels out like the image below helped speed up the assembly process as I already knew which panel attached to which side.

The most critical part of assembling the lid is to make sure that the cutouts on the rear panel are aligned to the edge of the lid panel that has the cutouts. This will become important when it comes to adding the hinges. After the back panel is attached, I worked my way around until the lid structure was assembled.


Once the structure is assembled, it's time to attach the face plate. I put wood glue on the panel to begin with and then used a few drops of CA glue on each end and the middle. The CA glue is creating a bond in about 20-30 seconds that will hold it in place while the wood glue cures, which can take up to 24 hours.


After the face plate is attached, use the same method to attach the name plate on the center of the piece. This can be aligned to be perfect, but I just got it close using the rectangular marks on the face plate.


Case/Hinge Assembly
The first tricky part of this assembly is the hinge assembly. Not all of the pieces can be glued together. If they were the hinge won't function properly. Gather all of the hinge pieces shown in the image below.


The best way to assemble the hinges is to do assemble them on the box itself. If you try to assemble them by themselves, it could result in items not being spaced properly for the cutouts on the box. Get the base and lid assemblies that were made previously and stack them on top of each other.

Start with one side of the box. The first step is to assemble one of the lighting bolt shaped pieces to the base section where it lines up with the two slots. Only put glue on the parts that will touch the box! Use a drop of CA glue in a couple of spots to help create an instant bond to hold the piece in place.


Once that piece is secure, take a top hinge piece and put glue on only the edges that will touch the lid of the box. The way these hinges were designed, the bottom parts of the hinge all glue to the base assembly and the top parts all glue to the lid assembly. Again, put a couple of drops of CA glue on the areas that will touch to help it stay in place.

At this point, the hinges are not attached to each other at all and the lid should separate from the base with no issues. This is where it gets tricky. There is a circular rotation piece that goes into the hole of the top hinge piece. This circular piece needs to be glued to only the bottom hinge part. This is what connects the lid to the base. Put a little wood glue on the circular pieces and a drop of CA glue in the center. I did this to both sides before putting it into place. This was easier for me, but it also means that you need to be fast with the following step before the CA glue dries. Then gently push it into the top hinge piece until it touches the bottom hinge part we put on first.

Once the circular piece is in place, glue up another bottom hinge piece and secure it into place and squeeze the two bottom hinge pieces together until they both touch the rotation piece.

Continue this process for the remaining pieces of the hinge. Take your time while doing this as gluing the top and bottom hinges together will cause the box not to function.

Once one side is complete, continue the same process on the other side. Be sure to not put any glue on the sides of the hinges that are on the outside. After you are finished, set the box to the side and let it dry, preferably overnight, to give the wood glue time to cure.


Drawer Assembly
The last part of this assembly is the drawer. The frame of the drawer is pretty simple, but the locking mechanism and stack-up of parts can be tricky. Before you get started, I suggest going ahead and assembling the drawer dividers as these are press fit together and do not require any glue. Once they are assembled, set them to the side. We will use these when assembling the drawer frame to make sure that they fit as expected.


Once the dividers are assembled, move onto assembling the framework of the drawer. Start by gathering all of the pieces that you need for creating the drawer as seen in the image below.

I started by gluing the four walls of the drawer to the bottom panel of the drawer. This is the same process used in the base and lid assemblies.


After the frame is assembled, it is time to attach the front cover and handle. This will be done simultaneously. Apply glue to the front cover and one of the handle connection pieces. Line up the front cover so that the handle connection piece will slide through the rectangular cutout in the drawer frame. Then, slide glue the small rectangular piece and slide it into the cutout on the handle connection piece. This will secure the front cover to the drawer frame.


Once one is assembled, it's time to assemble the drawer handle parts. Glue the handle rotation pieces to the handle itself on both sides.

After the handle is assembled, insert it into the handle connection piece that is attached to the drawer. Then, glue the other handle connection piece into place on the drawer to hold the handle into place. It is critical that you do this to be able to get the handle into place.


The next step is to begin assembling the lock plate parts together separately. These will be attached to the drawer later, but it is easier to assemble these by themselves. You will need the Lock Back Plate, Lock Face Plate, and the Locking Pin parts. Glue the Lock Face Plate to the Lock Back Plate by aligning the shapes together. Then glue the Locking Pin into place, making sure that the "key teeth" shapes are facing down toward the rectangular part of the Lock Plate.


Once the assemblies for both sides are done, it's time to attach the Key Hole Plate to the drawer on both sides. Glue the Key Hole plate to each side of the drawer by lining up the cutouts on the Key Hole Plate to the drawer's face plate. Then, glue the Lock Plate assemblies into place on each side.


The last step of this assembly is the trickiest part of the project due to the order of operations. This will be the assembly of the actual locking mechanism for the box. TO start, glue the Key Hole Pin to the Key Face Plate.

Once that piece is secure and the glue is dry, attach the Lock Rotation Piece. This will be the smaller of the two circular pieces that will be on this section.


The next step is to glue another one of these rotation pieces onto the assembly. This circular rotation piece will be the same size as the previous one. After these pieces are assembled, slide it into place on the drawer's Key Face Plate. DO NOT glue any other pieces onto this until it is inserted into the drawer.


After this assembly is put into the drawer, attach the Lock Rotation Piece for the Drawer Section to the other side. This piece will be slightly larger than the previous rotation pieces.


Lastly, glue the Locking Piece into place. The orientation of this will determine how your drawer functions. For me, I wanted the Key Face Plate in a vertical orientation when the drawer is locked. This means that this piece needs to be glued on so that the longest dimension is going vertically in the direction of the Key Face Plate. As you turn the Key Face Plate to the side, the Locking Piece should rotate with it. Let this assembly sit overnight or at least for a few hours to dry. Once assembled, with the right orientation, the drawer should slide into place locking both the lid and drawer in place.


STEP 6: Enjoy Your New Art Case!
If you've made it this far, it's time to celebrate! Be sure to put the drawer divider in if you haven't already done so and start filling up the art case. To open/lock the case, make sure that the Key Face Plates are in the correct orientation to slide through the cutouts of the case, then turn them to either lock or unlock the case. If you make your own case, let me know! I'd love to see your creation! Check out the full build video below!


