
Sometimes, I have clients that ask me to engrave custom items that they purchase from various suppliers. In this case, I had a client ask me to engrave some bottle opener keychains. This gave me the perfect opportunity to create a how-to video!
DESIGN TEMPLATE
MATERIALS USED
- Bottle Opener Keychain: GFT120
- LA's Totally Awesome Cleaner
TOOLS USED
For this project, I used my laser machine.
- Laser specs: 60 watt Epilog Fusion M2 40
- Vector Cutting: 5% speed, 100% power, 625 frequency (25%)
- Raster Engraving: 50% speed, 100% power achieved my best results
STEP 1: Create the Artwork
Setting up the artwork for these types of bottle openers is fairly straight forward. Once you download the design files, you will need to replace the placeholder logo design with your custom design.
The file is set-up in multiple layers that can be hidden or shown as needed to create the jig and to engrave the bottle openers. After this file is set-up, you'll be able to make the jig.

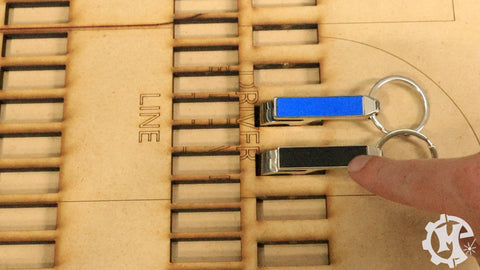
STEP 2: Make the Jig for Your Machine
For my jig, I am using 1/4" thick MDF. I would recommend using 1/4" thick material of your choice. Use the BORDER layer to cut spots for the keychains to sit into. This will be a vector cutting operation.
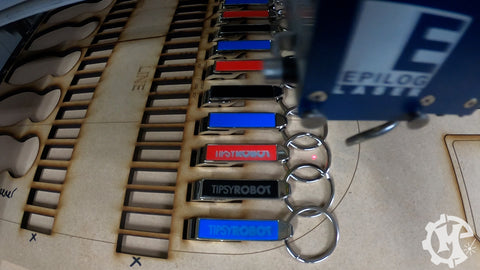
STEP 3: Begin Machining the Keychains
After the jig has been made, load it with keychains. While doing this, make sure that the keychains are laying parallel to the laser bed. This will ensure accurate engraving.

Once the keychains are in and everything is parallel, begin laser engraving.

STEP 4: Cleaning Up the Keychains
After the engraving is complete, I use LA's Totally Awesome Cleaner, which can be found at Dollar Tree. I spray a little bit onto the keychain and wipe it clean.


Once it is all cleaned up, enjoy your beverage of choice!

