One of the best things about the laser is the versatility. A lot of different materials can be engraved and even cut, which gives us the opportunity to make a variety of products.
The downside to having so many material options, is that each material has it's own optimal or perfect laser settings to achieve the best results. Now, keep in mind that "perfect" is subjective and up to personal preference. Where one person may like a lighter engraving color contrast, someone else may like a darker color contrast.
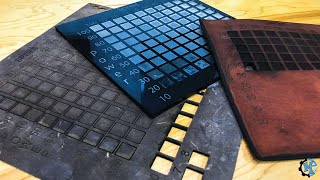
Using this grid method is a great way to find out what different settings will look like. This can take a while to machine, but will be a great resource for as long as you own a laser.
DOWNLOAD MATERIAL TEST FILES
When using this file, you may need to run one row at a time using the color mapping option. This will allow you to specify the power and speed for each RGB color code. This will save time on producing this file versus machining one square at a time.

This file is meant to be a guide and may need to be altered depending on the make and model of your laser. If you have any questions, feel free to contact me.
14 comments
I don’t monitor the comments often so I apologize for the delay. I will try to answer all of these. To adjust the power per red square, you will have to do it row by row. There isn’t a great way to do it otherwise. For speed of 10, 20, etc. that is a percentage from 10% to 100%. I am not sure why there would be a difference in intensity based on color.
Appreciate the video. Purchased a Sculpfun 30w and there isn’t a lot of material out there on the machine, so this helped a lot. You mentioned Laser U. Do you have a link for that? All I am finding is different Laser classes/topics from University’s and something on Laser Therapy. Thanks again!
I have down loaded your gird pattern and I understand the concept. I am having trouble with how to make each square different. I have an Epilog Fusion Pro 32 CO2. I use CorelDraw for my graphics software. I understand about being able to engrave by color in the Epilog software manager, where I am getting confused is with example setting red for 10% speed, how do you also apply a different power for each of the different red squares? I am sure it is simple and I am just missing a step. Thank you in advance.
I’m new to this, please bare with me, so when you say speed of 10, 20, etc, what does that mean? My RD works is listed in inches per second. Also, I have min and max power, so what would you set power at for these? I noticed in RD Works, that default power seems to be set to 30% min and 30% max. I have a 150 watt laser with a max output of 180. Any help is greatly appreciated. Thanks
I have a Epilog Fusion and got 8 squares from the top and assigned the power and speed to each RGB color (one’s with 255 values). When I printed it shows the intensity of the color also. For example yellow is way lighter, regardless of the speed and power. Is the an additional output setting to fix this? And can I use the other mixed RGB colors for color mapping so I can do more than 8 at a time?